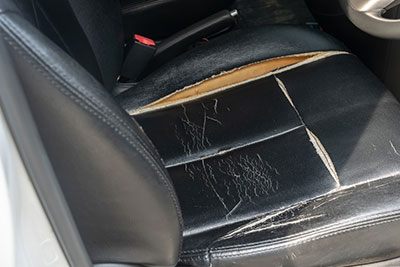
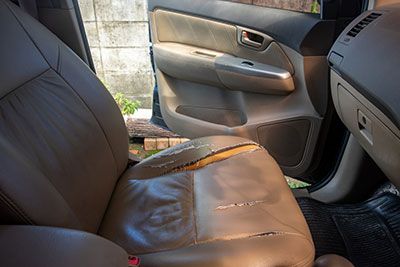
As a driver, you know just how quickly your car's interior can go from spotless to trashed. Whether it's muddy shoes, sticky snacks, or a small tear in your leather upholstery, it may seem impossible to balance kids and repairs.
Fear not! Repairing leather car seats is easier than you might think - with a few simple tools and some time set aside for the job, you can have your vehicle look new again.
In this guide, we'll provide clear instructions on how to repair tear leather car seats successfully so that even the busiest parent isn't intimidated by taking on this sometimes tricky task.
More...
Take Away Key Points:
Fixing the torn leather seats for a refreshing inner vehicle look
If you need to fix the leather seat in your vehicle, relax! You can easily do the job once you gather the leather repair kit and follow our comprehensive guide below.
We included all the steps to easily repair the DIY leather car seat. Let's begin.
Method 1: Leather car seat repair with a leather repair kit

This is the first method to apply, so follow the steps below for the best results.
Step 1: Matching the cover with the damaged area
When selecting a leather repair kit, choosing one with the same color as your car's upholstery and the damaged area of the leather car seat is crucial.
You should try to get a leather repair kit from the same manufacturer as your car first if you cannot, compare several kits and select the one that best matches the color of your leather car seat.
Step 2: Cleaning the leather car seat
Clean the leather car seat with mild soap and a damp cloth. Gently scrub away any dirt, dust, crumbs, or grime. Use scissors to remove the loose threads. Make sure to let the seat completely dry before you take further steps for the leather car seat repair.
Step 3: Trimming excess parts
Cut away any frayed edges around the tear leather seat. Snip off any threads or outward-curling edges to make a neat finish to the leather seat.
Step 4: Gluing the damaged surface
Secure a piece of supporting fabric beneath the tear or holes and apply some glue to its edges to make the leather car seat repair compound. Make sure the glue is completely dry before proceeding.
Step 5: Building up layers of the leather car seat fillers
Use a palette knife to layer leather filler onto the backing cloth around the tear or holes. After each layer has dried, add another until it slightly exceeds the edge of the seat to make the leather damage easily repaired.
Step 6: Sanding down the leather filler
Use a sanding block with fine-grit sandpaper to gently remove any uneven filler parts. Take care not to sand away too much of the surrounding leather. Doing so will give you more control over the area and leather damage.
Step 7: Wiping the leather car seat with a clean cloth
Wipe the whole seat with a damp rag cloth to remove dust and debris. Let the seat dry before continuing the leather car seat repair process.
Step 8: Applying the colorant to the filler
Rub the colorant onto the surface with a clean cloth to match the top layer. You may need to build several layers, allowing each layer to dry thoroughly.
Step 9: Covering the surface with leather sealant
Cover the repaired area with leather sealant to prevent the colorant from rubbing off. Wait for the sealant to dry before sitting on the seat.
Method 2: Applying a leather patch to the damaged surface

For the car seat leather repair, follow the steps below:
Step 1: Choosing a patch matching your leather car seat
Get a leather patch that matches the seat exactly, like a leftover swatch or a piece of upholstery near the frame. If not available, select another piece with a similar texture and dye it to blend in with the torn leather. They can be purchased online, in auto repair, or furniture stores.
Step 2: Trim the patch to fit the harmed areas
Trim the patch bigger than the tear-damaged area to attach it to the surrounding good leather. Then, carefully use sharp scissors or a palette knife from the kit to trim a neat edge and fix the tear.
Step 3: Placing wax paper behind the tear or hole
Place a piece of wax paper, slightly larger than the patch, behind the hole or tear. Slide one side in, then push the other side through the tear, so it lies behind the torn leather. This prevents glue from hardening the foam interior of the seat and fabric.
Step 4: Using leather adhesive to attach the patch
Secure the patch to the top layer of leather with adhesive. Apply leather adhesive to the patch's edges and press it over the hole or tear, ensuring it covers it entirely and bonds to the good leather. The glue will fix the torn parts.
Step 5: Ensuring the adhesive is drying completely
Allow the adhesive to dry completely. Follow the instructions on the leather adhesive packaging to determine how long it takes to cure. Please do not sit on or place any objects on the seat until it has dried.
Method 3: Liquid leather for refinishing
To repair your leather car seat with this method, ensure you follow the steps below:
Step 1: Liquid leather must match the area perfectly
Make sure the leather is a perfect match for the leather car seat repair. You can send a small leather swatch to the liquid leather distributor (there should be an extra underneath the seat) to find the right shade.
Alternatively, provide the color code or name to the distributor to ensure you get the right hue. Liquid leather combines filler and adhesive that can be bought online and in various auto parts & upholstery stores.
Test it on an unnoticeable seat part first before applying it to the rest of the auto. Then, adjust the color with toner if needed, or exchange it for a closer match.
Step 2: Cleaning the leather seats
Clean your leather seats by sweeping away any debris and crumbs. Take a soft cloth or rag and dab some leather cleaner onto it. Rub the cloth against the seat to remove dirt and grime.
Next, take a clean rag with a mild solvent, such as 50% isopropyl alcohol, and wipe down the seat to remove any residue. Make sure to allow the seat to dry out completely before doing anything else.
Step 3: Adding diluted liquid leather
To patch up worn areas, apply diluted liquid leather with a sponge. Dilute the liquid leather with water by 30%, then rub it into any cracks and creases.
Use a damp cloth to remove any product from areas of good leather, leaving only the product in the cracks. Allow the liquid leather to dry; if needed, add another layer to strengthen the color or build up cracks further.
Step 4: Adding a full-strength coat to the entire leather seat
After the worn areas have dried, apply a full-strength coat of liquid leather to the entire seat. Doing this will bring uniformity to the color of the entire seat and make any repaired areas less visible.
Step 5: Conditioning the leather seat after it completely dries
Once the liquid leather has dried, condition the leather to prevent additional cracking. Apply a soft cloth and leather conditioner over the entire seat. Let it dry thoroughly before sitting on it.
Method 4: Preventing further leather damage

To apply this method and save your car interior, please follow the steps below:
Step 1: Using a sunshade
To protect the leather from fading and cracking, use an expandable sunshade in your windshield. Place the sunshade whenever your car is exposed to direct sunlight, such as when it is parked in the office parking lot during the day.
Step 2: Regular conditioning of the leather
To prevent the leather from drying out and cracking or tearing, condition it regularly. First, clean it, then apply a leather conditioner every six months with a soft cloth in small circular motions.
The best way to protect your leather is by avoiding too much scratching and tearing since scratches can be treated relatively quickly, but tears are difficult to repair. You may find someone who specializes in leather repairs and reconditioning, but it is not always easy to fix tears in the material.
Step 3: Avoiding sharp objects
To avoid damage to the leather, be mindful of sharp objects like keys, tools, and pocket knives. Removing them from your pockets before getting into the car is best practice. You can also store them in the trunk or on the floor or cover your seats with a thick blanket first.
FAQs
How much does it cost to repair a small tear in a leather car seat?
The repair of a tear in a new car might cost between $75 and $300, based on several factors - whether you hire professionals or save money and repair on your own. A complicated tear might cost $100 to $200 per hour for a new car.
Where can I get my leather car seats repaired?
You can repair the tear leather seats in the new car in various auto repair shops or furniture shops.
Will child car seats damage leather?
Yes, child car seats can damage your leather, so you should use covers to protect the leather.
How to repair car leather seats from water damage?
You can apply to mill or massage the leather to soften it if it hardens due to water damage.
What is the best leather repair kit for car seats?
The best leather repair kit is the Fortivo repair kit. The repair kit is ideal for leather and vinyl car seats and furniture tear parts.
Summary
Don't worry too much if your leather gets damaged!
You can fix it with the DIY tear kit, color spray, and other methods to repair tear leather car seats and make your car interior new again. Ensure you choose the best way, and see the difference!
